Set up HeyBirdy for your business
Quick answer
Sign in as an Admin and follow the Get started with HeyBirdy checklist on your Dashboard: connect WhatsApp Business, set up Instant Answers, train your Knowledge Hub, test in the playground, send a test message and invite your team. Each step opens the page where you do it.
The shop opens at ten. Last night three customers asked on WhatsApp whether the new batch of kuih lapis had arrived, and nobody saw the messages until this morning. You want those questions answered tonight, even after the shutters come down.
HeyBirdy puts your WhatsApp Business number, an AI assistant and your team in one place. The assistant answers the questions you have taught it, at any hour, and hands the rest to a person. This page walks you from your first sign-in to a working setup. Each step links to the page that covers it in full.
With HeyBirdy you can:
- Reply to every WhatsApp customer from one shared inbox.
- Teach an AI assistant your prices, hours and policies so it answers for you.
- Pass the questions it cannot answer to the right person on your team.
- Send approved WhatsApp templates to your whole contact list.
- See how satisfied customers are and how quickly your team replies.
Before you start
- You have a HeyBirdy account, or an invitation email from your workspace Admin.
- You have access to the Meta account that will own your WhatsApp Business number.
- The setup checklist is shown to Admins. Support Agents can skip to Sign in to HeyBirdy and Find your way around.
Activate your account from an invitation
If a colleague invited you, the email contains an activation link.
- Open the link in the email. The Activate Your Account page shows which access level you were invited as.
- Enter a New Password and type it again in Confirm Password. It needs at least 8 characters, one uppercase letter, one number and one special character.
- Select Continue with Password.
- When you see Account Activated, select Go to Sign In.
The link stays valid for 48 hours. If it has expired, ask your Admin to resend the invitation. If you already use HeyBirdy for another workspace, opening the link adds the new workspace to your existing account and you sign in as usual.
Sign in to HeyBirdy
- Go to the HeyBirdy sign-in page.
- Enter your Email and Password, then select Sign In.
- Or select Continue with Google or Continue with Facebook. This works with the Google or Facebook account that uses the same email as your HeyBirdy account.
Forgot your password? Select Forgot Password?, enter your email and select Send Reset Link. The email takes you to a page where you choose a new password and select Set Password.
Follow the setup checklist
When an Admin signs in to a new workspace, the Dashboard shows a checklist called Get started with HeyBirdy. It groups six steps into four phases: Connect, Train your AI, Verify and Grow. Each step shows roughly how many minutes it takes, and the next one to do is highlighted.
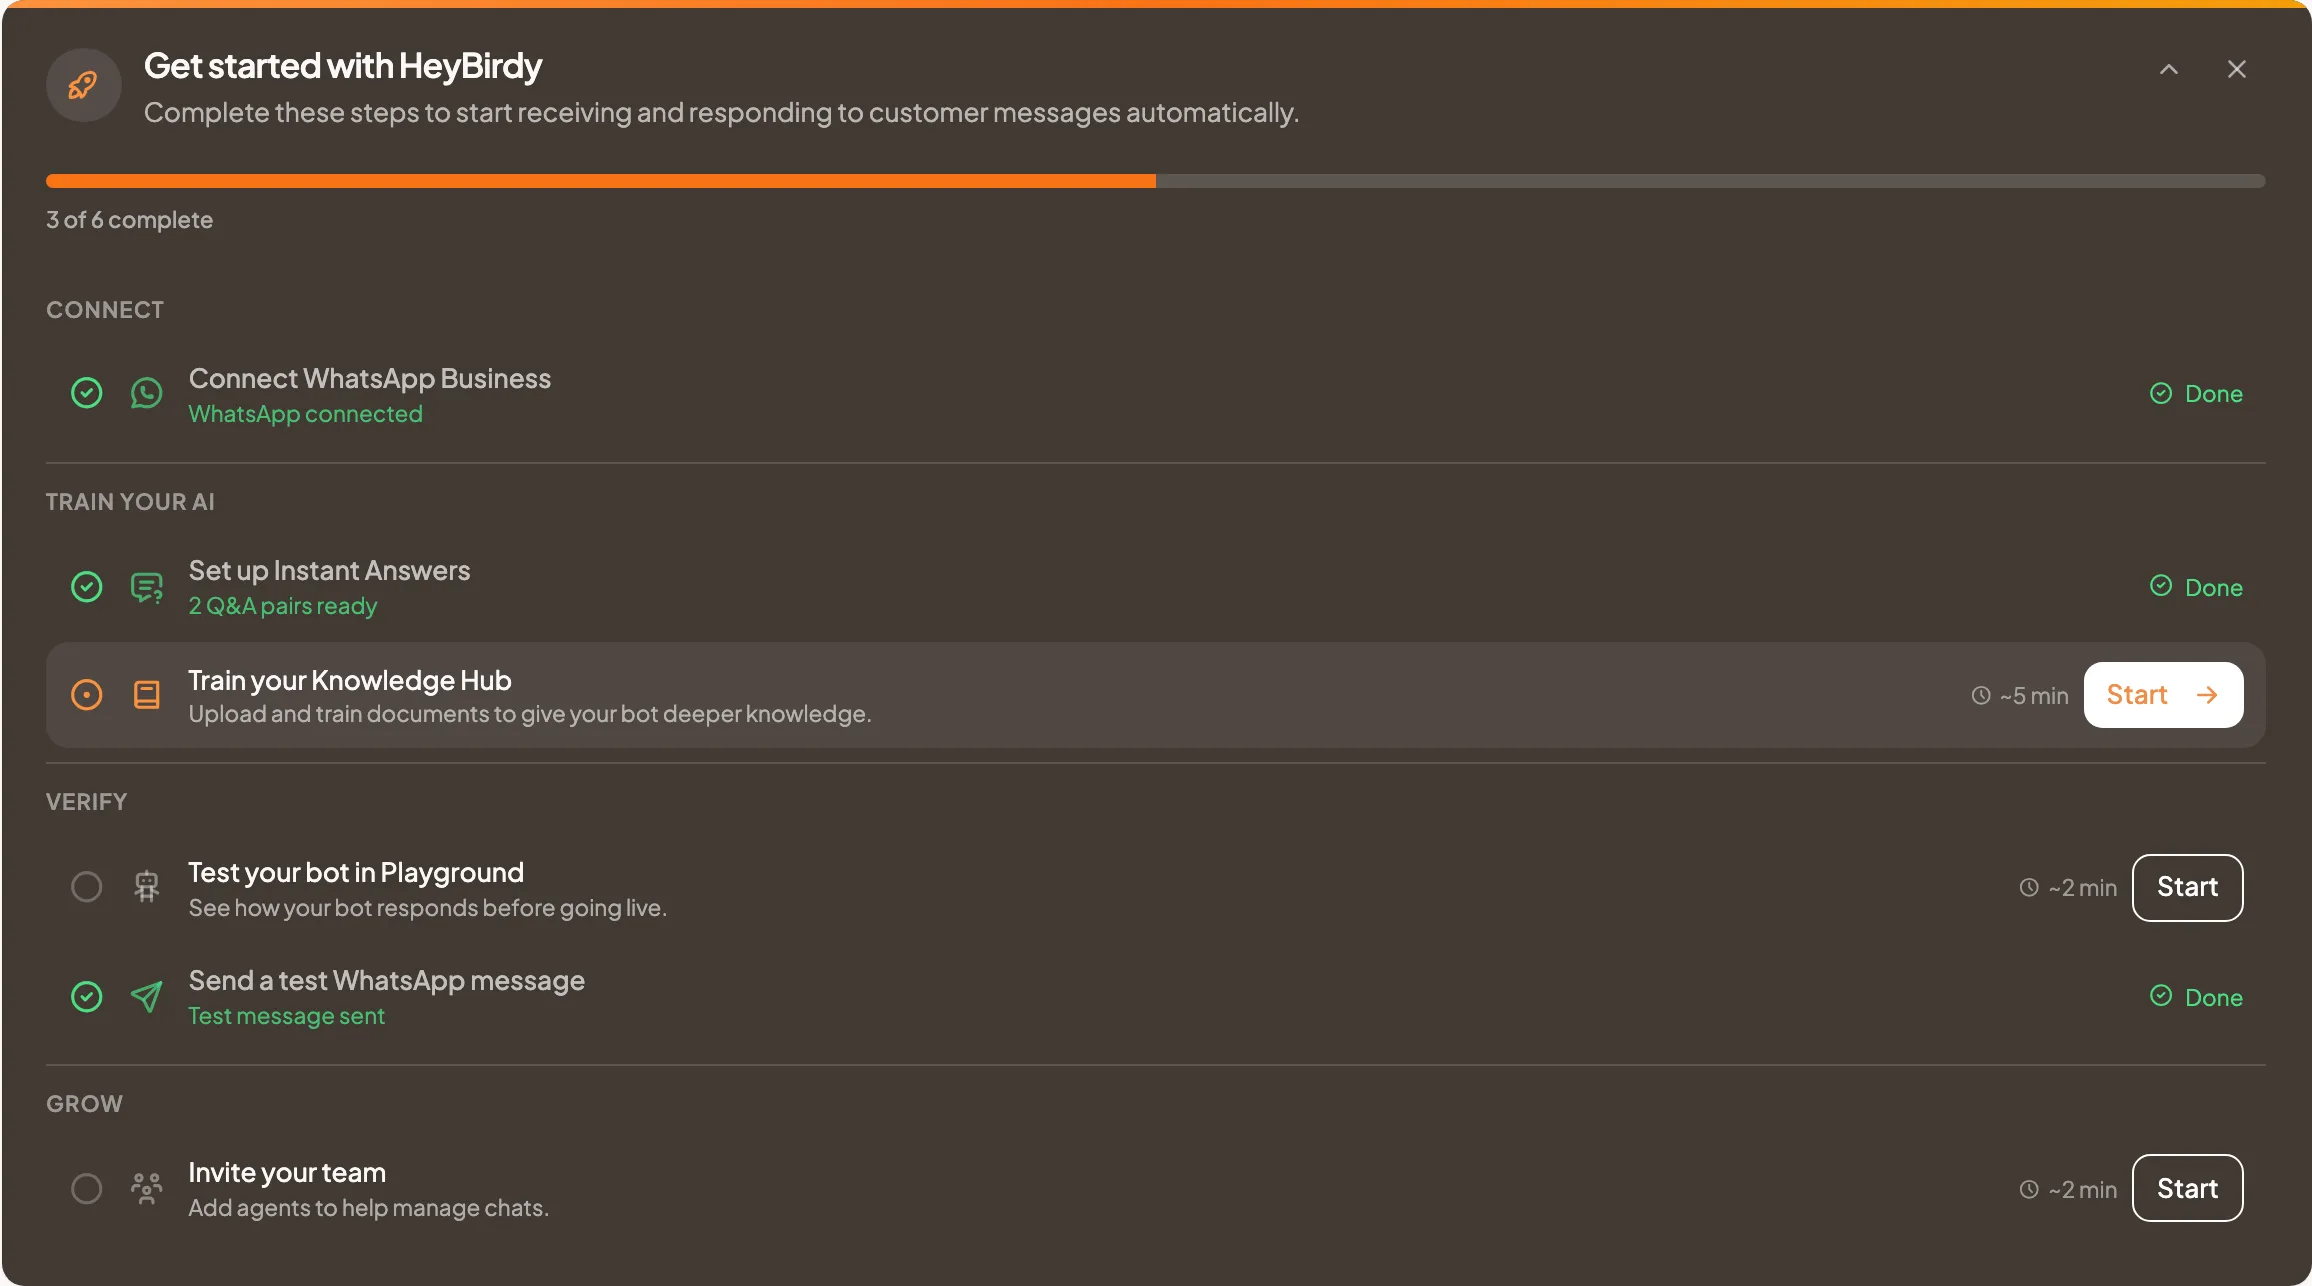
- Select Connect or Start beside a step. HeyBirdy opens the page where you complete it.
- Complete the step there. When you return to the Dashboard, the step is marked Done.
- Carry on down the list. A banner at the top of every page shows how many steps are complete, and Continue brings you back to the checklist.
Some steps wait for an earlier one. The training and Playground steps show Available once your AI assistant is ready, and the test message step shows Available after you connect WhatsApp.
Connect WhatsApp Business
Phase: Connect. This links your WhatsApp Business number to HeyBirdy so customer messages arrive in your inbox. Meta guides you through its own secure setup, which takes around ten minutes.
Follow the steps in Connect your WhatsApp Business account. If you are new to WhatsApp Business accounts, WhatsApp Business basics explains the terms you will meet.
Set up Instant Answers
Phase: Train your AI. Add the questions your team answers every day, with the answer you want given. Opening hours, halal status, delivery areas and the corkage policy are good places to start.
Follow the steps in Set up Instant Answers.
Train your Knowledge Hub
Phase: Train your AI. Upload documents such as your menu, price list or return policy, then train them so the assistant can answer from them. Uploading alone is not enough: the document has to be trained.
Follow the steps in Upload and train a document in Knowledge Hub.
Test your bot in Playground
Phase: Verify. Ask the assistant questions the way a customer would, and see how it answers before any real customer does. The AI Assistant Playground sits beside every page under AI Management.
Follow the steps in Test your assistant in the playground. If an answer is wrong or missing, AI assistant not answering shows where to look.
Send a test WhatsApp message
Phase: Verify. Send a message from your own phone to your business number, then reply to it from Chats. This proves messages travel both ways.
Find the chat in the chat lobby, then send your reply from the message composer.
Invite your team
Phase: Grow. Add the people who will reply to customers, and choose whether each one is an Admin or a Support Agent.
Follow the steps in Invite a team member. To decide who covers which hours, see Agent Assignment.
When every step is done, the checklist confirms that your workspace is ready to receive and respond to customer messages.
Find your way around
Everything lives in the sidebar on the left. On a phone, open it with the menu button at the top left. Support Agents see fewer items than Admins. Admin or Support Agent: what each can see lists exactly which.
The top bar holds the tools you use every day:
- The bell shows your notifications. See Choose which notifications you get.
- The time zone button shows your own time zone and your workspace's Business Clock.
- Your initials open My Profile, Notification Settings and Log out. See Update your profile.
Switch between workspaces
If you work for more than one business, or more than one outlet with its own WhatsApp number, you may belong to several workspaces. The name of the workspace you are in shows at the top of the sidebar and in the top bar.
- Select the workspace name at the top of the sidebar.
- Under Workspaces, choose the one you want. Each entry shows your role there.
A workspace with a lock beside it has blocked your access, so you cannot switch to it. If you belong to only one workspace, the name takes you to the Dashboard instead.
Ask Owltobot for help
Owltobot is the portal assistant that sits at the bottom of the sidebar. It is for you, not your customers. Type a question such as "How do I add a team member?" into Ask Owltobot... and it answers, takes you to the right page, or opens a form with the fields filled in for you to check and submit.
Select the plus button beside the box for Quick actions. Admins see shortcuts such as Invite team member and Create question, and everyone sees Summarize pending chat alerts and Summarize pending unanswered questions.